TAIZHOU FUPUSI MACHINERY CO., LTD
HuangJiao Road 880, Taizhou, Zhejiang China 318020
WhatsApp/Wechat: +86 186 6862 7050
Operation Manual
Catalogue
- Specification and Dimension ………………………………….……… 1
- Machine Usage Area and Characteristic …………………….…… 2
- Main structure and Usage ………………………………………………… 3
- Machine Operation, Usage and Maintenance…………………………… 4
- Malfunction and Repair Method ………………………………..…… 6
- Plastic Production Abnormity and Operation Method ……… 7
- Other ………………………………………………………………………..…… 9
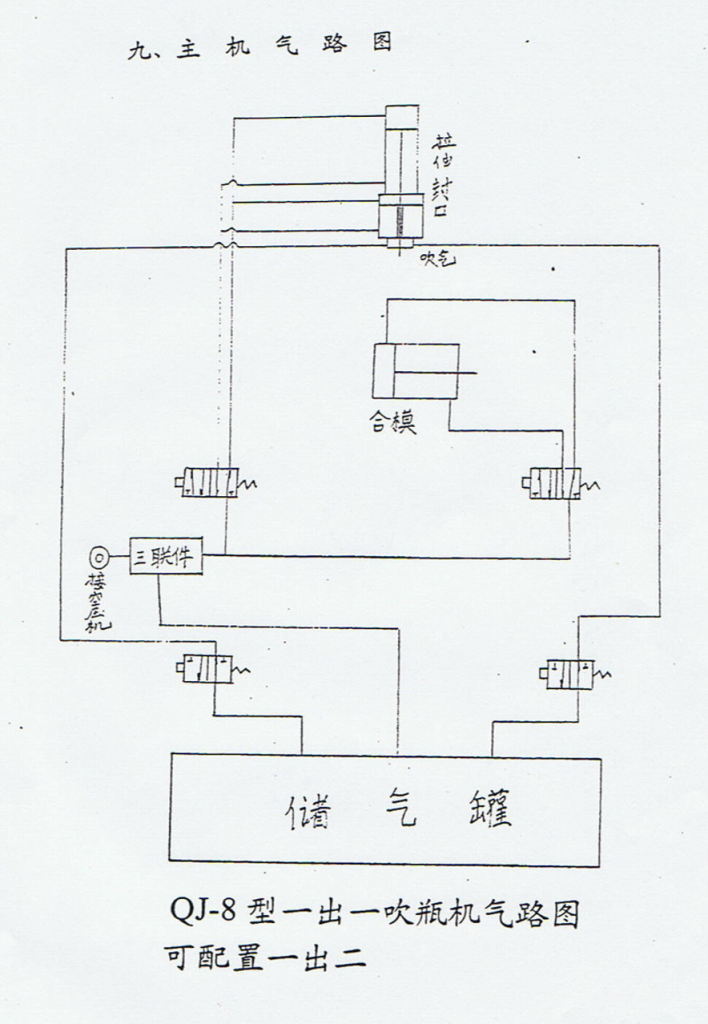
- Picture of Air System ………………………………………..……………… 10
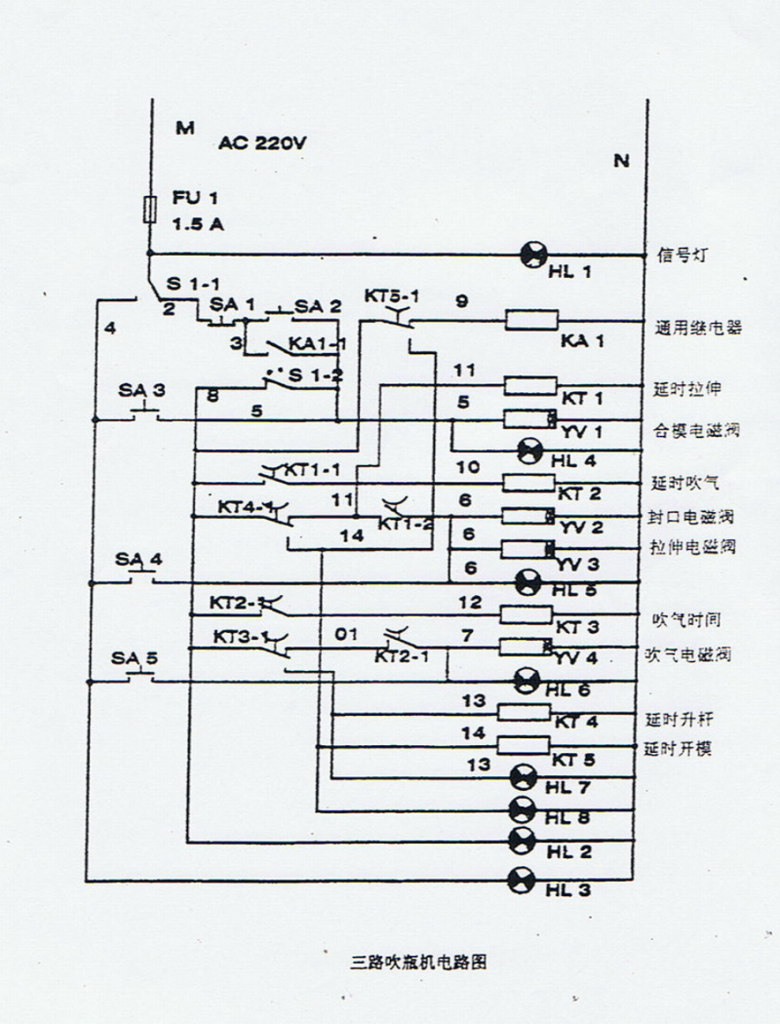
- Electricity Board Picture ………………………………..……………… 11
Machine Usage Area and Characteristic
1. Usage
PET semi-automatic blow molding machine used for producing PET products from PET performs. First: Heating the PET perform. Second: Blowing into Designed Product.
Our Blow Molding Machine can produce plastic products for automobile parts, household appliances, and daily necessities such as carbonated bottles, mineral water, pesticide bottles, oil bottles, cosmetics bottles, and wide-mouth bottles.
It is suitable for PET and many other materials. Moreover, our company can offer the relevant mold for your every need. Our machine is small in size, low in energy consumption, and high in productivity.
Characteristic
- Automatic Equipment (Temperature Controller and Time Relay
- Air operation system, many machines can use one air compressor
- Stretch Part: adopt stretch cylinder blows directly.
- Clamping Part: Large Clamping Force, Long Clamping Stroke, work steady, faster, etc
- The Speed of Blowing, Starting and Closing can be adjusted fluently by adjusting the valve.
- Air will be let out through a silencer, lower noise.
- Seven layers of heating, suitable for different lengths of preform.
- Two operation methods: Manual and Semi-automatic, easy to maintain, test, and produce.
9. Can be used for PET etc
—2—
3. Main structure and Usage
1. Clamping Part.
The clamping part includes an electromagnetic valve, front and back fixing plate, Moving Plate, Cylinder, etc.
Working Part: The electromagnetic valve connects with air, pushes the piston of the cylinder, then pushes the connecting rod to move the mold.
2. Locking Part:
The machine adopts three connecting rod locking structures, The cylinder pushes the connecting rod to lock the mold.
Under high pressure, there is no interspace between two mold plates, to ensure the quality of products.
3. Blowing, Stretch Part
This Part includes a stretch electromagnetic valve, high pressure blowing valve, a standing cylinder, one stretch stick, one sealing cylinder, a blowing air receiving tank, a connecting rod, etc.
Air will be connected through the stretch electromagnetic valve to push the piston of the cylinder, then push the stretch stick and sealing cylinder on the neck of PET preform. Meanwhile, air will be pushed from the air receiving tank, through high pressure blowing valve, and then the cylinder and stretch stick will blow the hot PET preform into designed plastic products.
4. Heating Part(Infrared Heater Part)
The infrared heater includes a frequency changer, electric machinery, a circumrotating set, preform plugs, a circumrotating chain, an infrared reflecting board, a rotating shaft, and infrared lamps. In the working part, electric machinery moves the rotating shaft, then drives the circumrotating set which rotates by itself, so that when the plastic preform rotates through the heating part, the infrared heater will heat the plastic preform equally.
Machine Operation, Usage and Maintenance
- Install the mould
- Bottle Mould Should be installed on the mould plates. Top part of the mould should be beside the bottom part of the cylinder.
- Close the ball valve to stop connecting the blow molding machine and air compressor, adjust the air pressure to 4.0mpa, then open the stretch electromagnetic valve, and put down the stretch stick.
- Move the cylinder forward or backward, to ensure the stretch stick is in the middle of the bottle. For this part, must be ensured that the stretch stick, middle of the bottle neck, and middle of the bottle bottom are on the same line.
- Open the ball valve, duo to connect with the air compressor, and open the clamping electromagnetic valve, to ensure the mould plate won’t move during the blowing.
- Adopt manual operation to check every movement again.
- Adjust the stretch stick
- Stretch stick is the blowing stick of the blow molding machine, it must be in the middle of the bottleneck and bottom. Stretch sticks can move forward or backward, upward or downward.
- Clamping part.
Adjust the clamping screw, and adjust the connecting rod to ensure the clamping distance which you need. Most important, to ensure the mould plate won’t open during blowing. - Preform heating part(Infrared Heater Adjustment)
The infrared heater includes 7 layers of infrared lamp, which can be adjusted according to different kinds of plastic preform. When using the different kinds of plastic preform at the first time, we should confirm the voltage of each layer. In testing, we can take 1-2 plastic preform to test, after heating, if the plastic preform is not white and soft enough, then it can be used to produce bottle. If the produced bottle is good enough, then note the voltages of each layer. You can use these data for reference in next time. - If the thickness of the plastic preform is too thick, for the heating, you have two choices,
A). You can add the voltages on each layer of the infrared lamp so that the temperature of preform will be higher.
B). You can adjust the electric machinery, the circumrotating chain can be rotated slower, so that the heating time will be longer and the temperature of preform will be higher. - If the thickness of the plastic preform is too thin, for the heating, you also have two choices,
A). You can down the voltages on each layer of the infrared lamp, so that the temperature of preform will be lower.
B). You can adjust the electric machinery, the circumrotating chain can be rotated faster, so that the heating time will be shorter and the temperature of preform will be lower. - Because of different weather in different places and many different kinds of plastic preform, there is no standard setting of parameters, so you should test before producing. Also, your note data and experiences are also important.
—4— - Time relay adjustment.
The blow molding machine has an eight-time relay to control the time of every movement. - Clamping time: from the preform to bottle.
- Locking time: time of two mould plates connecting.
- Stretching time: Include delay blowing time and blowing time (Can’t be longer than clamping time and shorter than blowing time).
- Delay blowing time: According to the preform. Usually for small bottles, within 0.2-0.5S in good.
- Testing before starting the machine
- Manual operation
Start the power, open the power lock, choose the manual operation, and check every movement, such as clamping, left stretching, left blowing, right stretching, and right blowing. - Semi-automatic
Choose semi-automatic operation, put the ready preform (after heating) into the bottle mold, start every movement, and when all is finished, start to work. - Malfunction and Repair Method
- Not clamping movement.
- The clamping electromagnetic valve has no electricity.
- Lower air pressure
- Cylinder sealing ring leaks; change the sealing ring.
A. Please check whether the air pressure is normal or not. Choose manual operation, and press the clamping button, if it doesn’t work, please check the circuit, then check the electromagnetic valve, if still doesn’t work, uninstall the electromagnetic valve, then wash, repair or change it.
a.The clamping is too slow.
- Check the spring of the electromagnetic valve, and whether it works well or not.
- Check the air system, whether air exhaustion is ok or not.
- Check the clamping cylinder, whether is leaking or not?
b. Check the twisted elbow which is connected to the moving cylinder, whether is lax or not.
B. Check the time relay; if no indication number, change it. If the time relay works, check the circuit of the time relay, the stretch part, the blowing part, and the clamping part.
C. Check the button, whether it’s ok or not. - No stretching movement
- The time relay broken
- No power for stretching the electromagnetic valve.
- air system okay or not?
- The clamping time is too short, closing time is
Other
- Atomized lubricator
An atomized lubricator is used for turning the oil to fog, duo to lubricate the piston of the cylinder. Must change or add oil every 15 days. - Water dividing tool.
Water water-dividing tool is used for collecting water in high-pressure air. The water must be cleared out every day. - Pressure adjusting valve
Working pressure is 0.6-1.0Mpa. - Silencer
Reducing the noise
Attention:
- Must be familiar with the machine first, then set up or operate the machine.
- The operator should operate according to the principle.
- Lubricate the machine according to the principle.
- Forbid adjusting the machine when the air is connected.
- Forbid the new worker from repairing the electric parts, opening the backward door of the machine, etc.
- Before testing the machine, please check the circuit first, all connections of the electric parts.
- If the fuse of the machine is broken, please be sure, must use the same one to replace it.
- Can’t repair the electric parts with power on.
- Please be sure, that every electricity connection is ok for the heater, blow molding machine, etc.