Contact: John Tao
Mobile/WhatsApp: +86 186 6862 7050
Email. Johntao@Fupusi.com
www.Fupusi.com
John Tao as the president of Taizhou Fupusi Machinery Co., Ltd. who has more than 15 years experience in plastic bottle industry field, he is focus on improving the quality of the machines and after-sales system
7 Guide rail (alarm information):
The message ‘Feed Rail Error’ appears on the screen and the machine stops running.
Reason 1: The preform is blocking the feed rail.
Solution: Check if the feed rail is blocked. Remove the stuck preform and adjust the track width if necessary.
Reason 2: The preform storage tank is empty.
Solution: Refill the reservoir with pre formed parts.
Reason 3: The motor has excessive overcurrent, which makes the integrated thermoelectric system prone to tripping.
Solution: Check if the motor is damaged or if other foreign objects are causing the motor to get stuck.
Reason 4: The tractor servo alarm was triggered, causing abnormal operation of the pre formed tractor.
Solution: Please check if the preform track servo is abnormal, and if the preform track servo and bottle pushing action are normal.
Reason 5: The sensor is not aligned.
Solution: Loosen the sensor fasteners and adjust the sensor position until it lights up again.
8 Oven (alarm message):
When the alarm is turned off, an error message “Oven Overheating” appears on the screen.
Reason: Insufficient ventilation or loose temperature sensor.
Solution: Check if the potentiometer dials on both frequency converters are set to the correct speed (above 30 Hz), and verify that all blower and exhaust fans on the oven are functioning properly. Check if the oven temperature exceeds 200 degrees Celsius and if the thermocouple fasteners are loose. Check exhaust motor, check inverter alarm (x05)
9 Abnormal cooling warning (alarm message):
When the alarm is turned off, an error message appears on the screen, indicating that the water temperature in the cooling water channel is too high.
Reason: Insufficient cooling of the waterway
Solution: Check if the supply and return valves of the cooling water system are open, and if the cooling tower is running.
10 Pre formed spindle track error: (alarm message):
The machine stops running and displays the message ‘Preformed Spindle Track Error’.
Reason: Abnormal transfer case warning sensor error.
Solution: Check the limit switch on the feeding track. Check the limit switch on the unloading guide rail. The rotating motor is overloaded.
(11) Servo motor (alarm information):
The machine automatically stops and the indicator light is on
Reason 1: The servo system is not ready.
Solution: Check for any false alarms in the clamping, conveying, or rod systems.
Reason 2: The servo system does not return to its original position
Solution: Press the “Home” button on the control panel until the manual operation shows “Completed”. If there is an alarm, check if the preform feeding and unloading system is in place. (Check if the preform feeding system is located at the back, top, rotating backwards, positioning downwards, pressing the preform or sliding platform backwards position.) Until the error is eliminated and normal operation is restored. If the problem persists, please check the abnormal status of the servo drive and refer to ASDA-A2 (Causes and Handling of Servo Drive Abnormalities) for the abnormal serial number to solve the problem.
Reason 3: The action of the transmission sensor is not in the expected position
Solution: Check if there are any objects blocking the track, if the sensor is damaged, or if the installation position is incorrect.
Reason 4: Position deviation of pole positioning sensor
Solution: Check if the screws on the switch base are loose, move the lever up and down, adjust the switch to turn on the indicator light, then lock the switch, use manual operation to move the lever up and down, and observe if the switch action is smooth.
Reason 5: Position deviation of clamping system sensor
Solution: Check if the position deviation is caused by loose screws on the switch base, move the base mold to its original position, readjust the sensor switch until the indicator light lights up again.
(12) Manual operation error (alarm message):
Before manual operation, reset the origin on the manual operation homepage, and then other operations can be performed
13 Abnormal lamp holder:
Reason: The light is broken.
Solution: Turn on the thermostat and check if the light is working properly. Turn off the main power supply of the electrical cabinet, carefully remove damaged lights and replace them with new ones. Attention: When replacing the lamp, due to the high temperature of the lamp and heating furnace, for safe replacement, the replacement personnel must wear heat-resistant protective clothing and gloves.
VI. Emergency stop:
If any abnormal accidents occur during operation, please press the emergency stop device on the machine to immediately stop running. Switch to manual operation to solve all problems. Set the mold to automatic mode, and the machine will automatically become the origin position. Press the start switch, and the machine will restart, starting a new round of operation.
Attention: When replacing the mold, special attention must be paid to the safety of the operator and the machine by manually opening/closing the mold. Before operation, first adjust the operating pressure to 5 kg/CM2.
2 Stretch blow molding station:
Occasion:
1 When installing a new machine.
(2) When the size of the mold or bottle changes.
(3) When the size of prefabricated components changes.
Steps:
(1) Turn off the power and release the pressure in the pneumatic system.
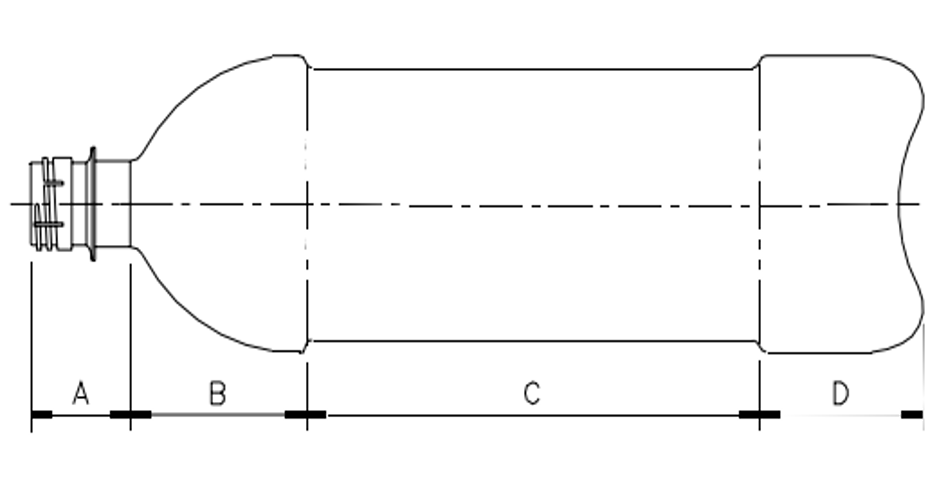
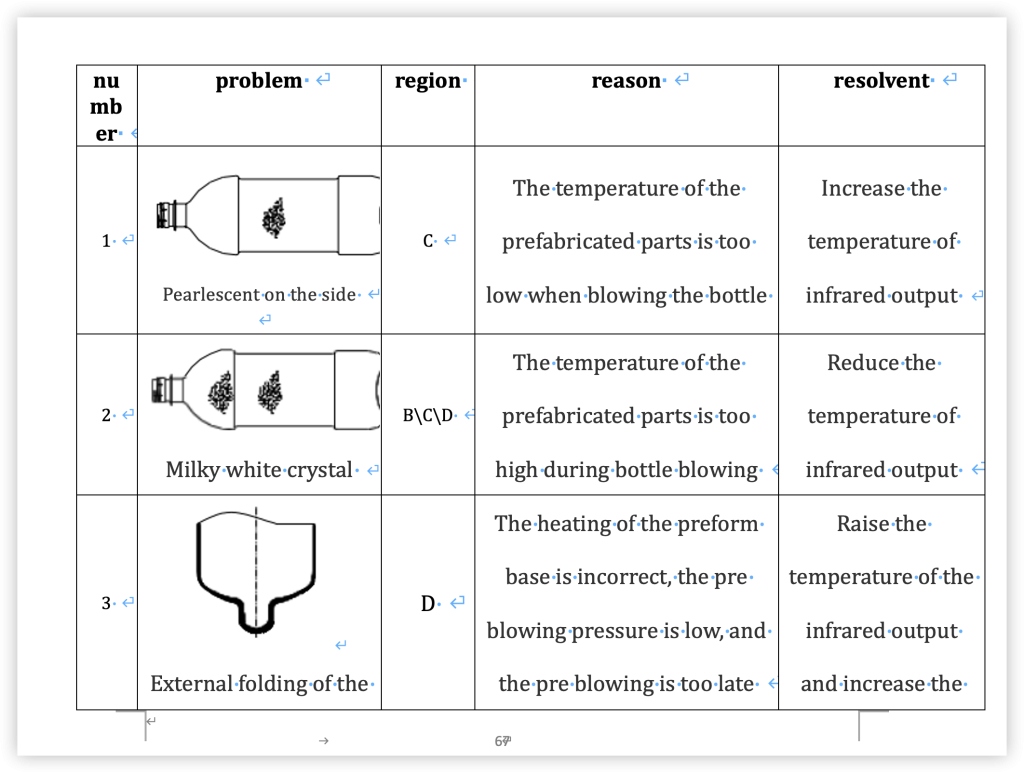
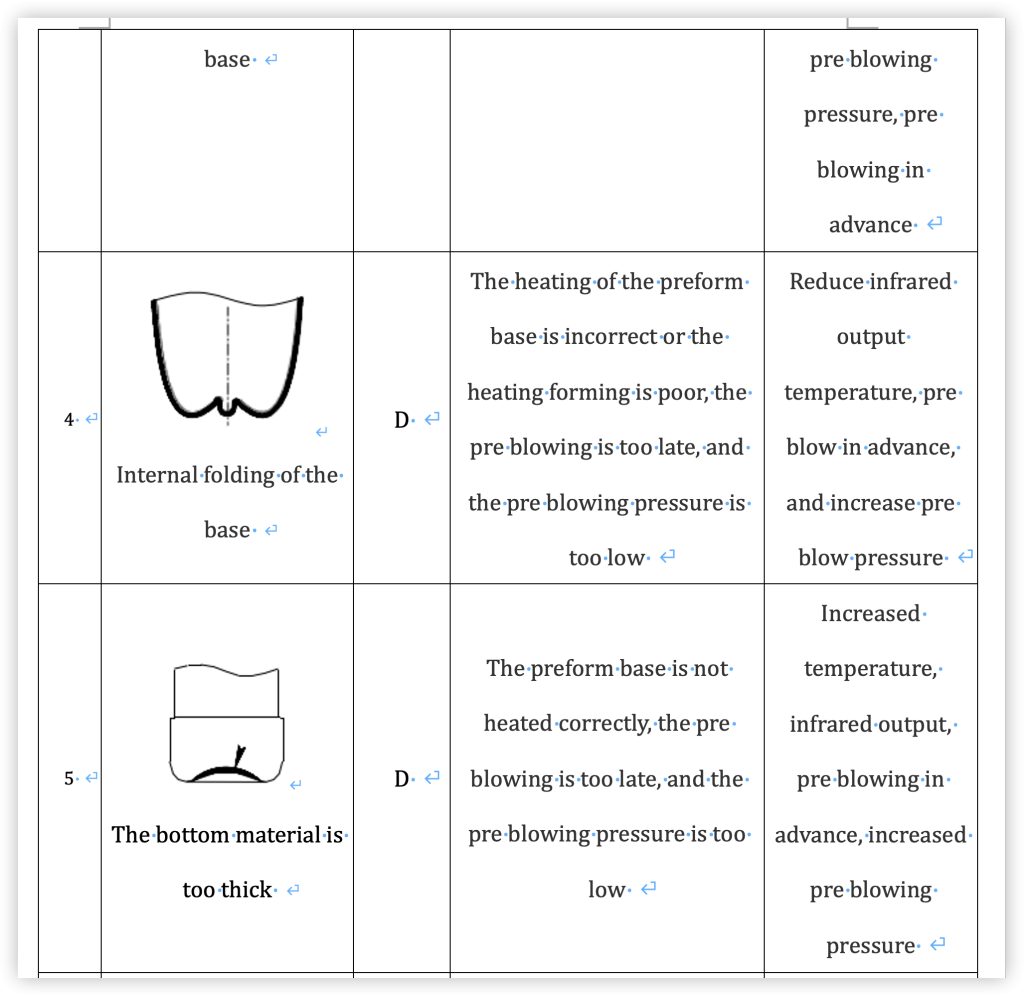
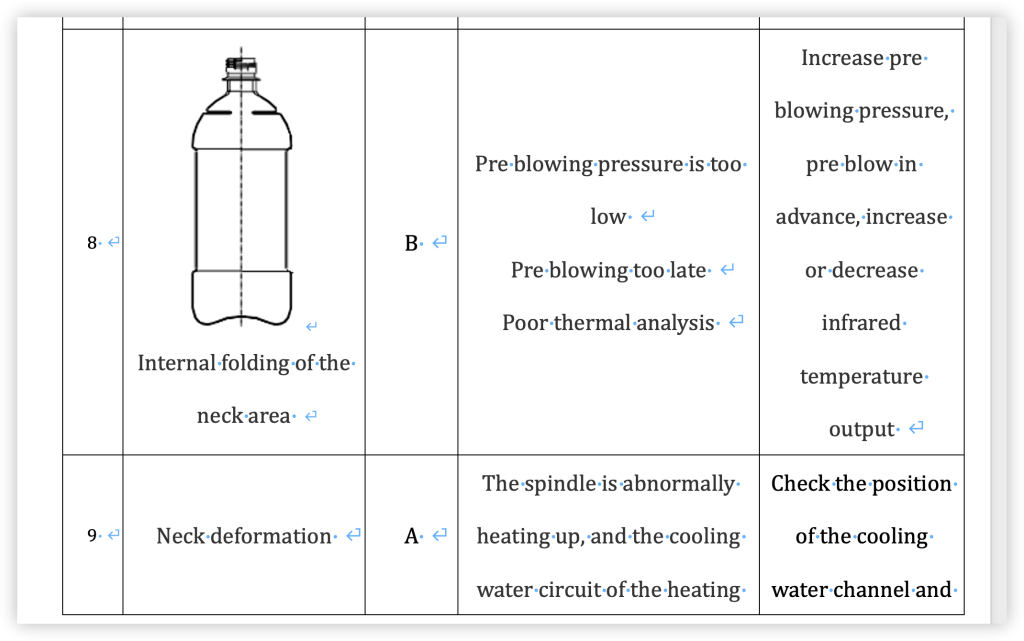
(2) Based on the original position, read the scale according to the pre blowing height (excluding the neck height) (Figure C), move the pre blowing sensor bracket into place and fix it.
(3) Push the lower mold to the dead center with force, then push the slider upwards to a position where the distance between the stretching rod and the lower mold is 2-3 millimeters (Figure D), read from the ruler, move the blowing sensor to the position and repair it.
Figure D
Attention: The origin sensing position has been fixed in the factory, and the pre blowing and air sensation should be adjusted according to this, so please do not move.
(4) Open the work pressure system and adjust the pressure to 7 kgf/cm2. Adjust the pressure of the robot to 5 kgf/cm2.
(5) Manually turn on the power, pull the lever upwards, and observe if the position of the positioning block is the same as before. Repeat this operation several times to move the stretching rod up and down, and then observe if the positions are the same.
(6) During the upward/downward movement of the stretching rod,
Observe whether the indicator light on the sensor is on.
VII. Maintenance and lubrication:
I. Maintenance and lubrication:
- Daily maintenance:
Daily maintenance is the foundation for maintaining the smooth operation of the machine, and operators can observe it during daily operation. In daily maintenance, the main job of operators is to understand the production and quality of bottles. It is inevitable that some problems will occur on the machine, so stop running immediately or find a solution to the problem to eliminate poor performance or quality loss.
According to the data provided by the operator, the machine should not stop running for more than one hour per day, and the overall performance is good.
In order to minimize material loss, the solution should be to solve the machine malfunction within one hour. Therefore, material loss, low machine performance, and abnormal damage to components can be reduced. Daily maintenance is almost carried out during operation, including checking all adjustable pre blowing pressure, blowing pressure, etc.
Operators should observe the operation of the machine and the conveying performance of preforms and bottles, such as feeding and discharging robots. However, daily maintenance is different. It can be adjusted according to the machine operator and production line. Therefore, the machine can run smoothly.
However, for appropriate applications, thoroughly inspecting the machine when it is stopped or the bottles are stored enough will be beneficial for the operation of the machine. Operators should pay attention to whether the filling oil in the operating pressure system and the lubricant in the precision divider are sufficient.
Attention: Operators should record all inspection records in the table and review them before weekly maintenance to take preventive measures to execute the work plan
VIII. Closing steps:
- Press the slider button to manually stop feeding.
- Keep the machine running until there are no preforms in the heating furnace and the last bottle is taken out by the robot.
- Turn off the power supply of the heating furnace.
- Change to manual operation.
- Turn off the power.
- Exhaust the air from the operating system and high-pressure purging system.
- Close the ball valves for the inlet and outlet of the circulating water.
- It is necessary to disconnect the power supply from all electrical components to ensure safety after operation, stoppage, or power outage.
VI. Mold installation:
I. Precautions for mold installation:
When replacing the mold, two or more people are needed to loosen bolts, screws, nuts, etc.
When replacing the mold, safety must be ensured.
When replacing the mold, the motor must be turned off. - Each sliding surface must be supplied with butter or lubricant.
If the mold has not been running for a long time, apply rust proof grease to it. - Screws, nuts, etc. The mold should be a standard component.
II. Precautions for replacing each component: - Spindle:
Occasion:
(1) When the size of the preform changes.
(2) When the inner diameter of the prefabricated component changes.
(3) When the size of the mold or bottle changes.
Steps:
(1) Turn off the power.
(2) As shown in Figure A, remove the C-shaped buckle on the spindle and replace the bushing.
Figure
(3) Press the “Shift” button shown in Figure B to move the bushing on the main chain.
(4) Repeat steps (2) to (3) to replace all bushings.
- Mold:
Occasion:
(1) When installing a new machine.
(2) When changing the size of the mold or bottle.
(3) When changing the size of the preform.
Steps:
(1) Close the chilled water inlet and remove the pipeline from the outlet ball valve. Drain the water from the pipeline and mold, and then disconnect the chilled water pipe on the mold.
(2) Open the mold and first remove the bottom.
(3) Remove the proximity sensor next to the mold.
(4) Press the ‘Manual Operation’ button to enter the ‘Forming Group’ manual operation until the ‘Close Right Mold’ is fully seated. Then remove the six M8 bolts that secure the bottom mold of the bearing and the four M10 bolts that secure the side bottom mold. Slowly pull the bottom mold outward (note: to avoid unnecessary damage, gently lower and do not damage), tap the old bottom mold groove to replace the new bottom mold, then place the new bottom mold into the guide groove from the side, move inward to a position, lock the M8 groove of the bottom mold, and finally set the side fixed bearing seat and lock the groove.
(5) Press the “Origin” button on the “Manual Operation” interface, place the mold into the guide groove from the side until it reaches the designated position, lock the side fixing block, and then install the M16 bolt, but do not lock it.
(6) Perform manual operation on the ‘Mold Group’, then press’ Close Right Mold ‘to close the mold, observe if the mold joint is normal, if the bottom mold position is correct, etc., then perform the’ Close Left Mold ‘action, and finally lock the M16 bolt.
(7) Gradually close the mold and observe whether the mold connection is normal and whether the bottom position is correct. Connect the chilled water pipe, open the inlet ball valve, and observe if the water circulation is correct.
(8) Place the proximity sensor next to the mold and secure it.
(9) Finally, test whether the performance of closing/opening the mold is affected by any object interference or in a poor state through the user manual.
Keeping the machine clean during daily maintenance will help the machine run smoothly. Wipe off excess lubricant on the machine with a clean cloth, such as the crank and guide rail of the forming station. Check if the mold is clean. If cleaning is necessary, wipe it with a dry cloth dipped in alcohol.
3. Inspection:
Check if the regulator, sliding locator, and blow molding regulator of the stretching blow molding station are correct? In addition, confirm that the distance between the heads of the three sets of magnetic sensors and the pads is 3mm. Check that the distance between all magnetic sensors and sensor positions is 3mm. Check whether the positions of the magnetic sensors on the robot cylinder and lower base plate are correct, and whether the performance of the photoelectric sensors is correct.
4. Safety devices:
Check if the emergency stop and safety switches are functioning properly.
5. Adjustment:
If any abnormal situations are found during maintenance, adjust them to normal values according to the data described in the production plan or the adjustments described in Chapter 4.
1. Machine cycle speed:
Observe the cycle timer on the control panel and measure the actual output with a stopwatch.
2. Inspection:
The quality of the bottle.
The air height of the feeding track.
Is there enough prefabricated rod in the prefabricated tank?
Is there any blockage in the water cycle?
3. Pneumatic system (pneumatic pipes, pipelines, connectors, and control valves)
Firstly, confirm whether the gas storage tank is within the limit range of the pressure gauge. It is necessary to check for air leaks through visual or auditory inspection. Check if the bolts and nuts of the pneumatic solenoid valve and pressure valve are securely fixed. Check whether the pipes, lines or parts of the air pressure system are bent or loose.
4. Cylinder:
Check if the work pressure is normal. The pressure at the front is 7 kilograms of force per square centimeter. The pressure of the robot is 5 kilograms of force per square centimeter.
5. After closing:
Check the drainage capacity of the filter and the oil level under working pressure.
Drain the air and water from the air storage tank.
Check each regulator of the stretch blow molding system.
6. Spindle:
O-ring of liner
Tighten the O-ring of the nut
spindle bearing
Self rotating spindle bearing
Check the timing belt and timing wheel
Check the spin spring for idle rotation
1. Drive system:
Timing pulley and timing belt
2. Rotating system:
Check if the keyless bushing and chain or chain shaft are loose
Check if the timing pulley and timing belt are loose. Check the condition of the chain
3. Self rotating system:
Check if the spinning wheel and chain are too loose
4. Forming system:
When the mold is closed, check if the crankshaft is at the dead center
Check the hydraulic shock absorber of the mold
5. Cooling water, cooling water:
Check the circulation of cooling water and chilled water
6. Robots:
Check the hands of the feeding and unloading robots
7. Stretch blow molding station:
Check the shock absorber of the stretch blow molding slider
Stretch blow molding sliding guide rod and guide rod seat
Is the telescopic rod deformed?
8. Air pressure system:
The working pressure of each muffler
Check the high-pressure muffler
9. Infrared light:
Carefully wipe the lamp with a clean cloth dipped in alcohol to remove dust from the surface of the lamp
Test the output of the infrared lamp with a controller
10. Reflector:
Wipe the reflector with a clean cloth dipped in alcohol. After being wiped, it is still unclear, then update it
11. Clean the electrical cabinet and operation panel: Blow off the dust on the electrical cabinet and operation board with filtered dry air, and then wipe them with a dry cloth. When blowing air, remember not to open the door of the electrical cabinet or operation panel